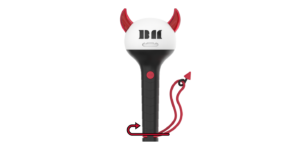
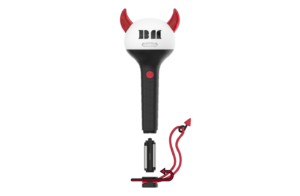
Inserting and Replacing Batteries
1. Turn and open the bottom cap on the product’s handle, then remove the internal battery socket.

2. Insert three AAA batteries into the socket as shown in the diagram. (Ensure the + and – ends of the batteries are correctly aligned.)
3. Insert the battery socket with the batteries into the product as shown in the diagram, following the arrow’s direction, and close the bottom cap. (Inserting the battery socket in the wrong direction may prevent the product from working and may cause damage.)
Installing the App
Download and install the “BABYMONSTER LIGHT STICK” app.
Important
If you don’t have a smartphone or are using a 3G phone, use a friend or family member’s smartphone to register your seating information. Alternatively, request assistance at the concert venue’s help desk. If you have two or more light sticks, the procedure can be repeated for multiple registrations. Registration opens the day before a scheduled concert. Ensure that Bluetooth is turned on your smartphone before registration.
1. Launch the app
Once the app is installed, tap the app’s icon to launch it.
2. Concert Mode
Select “Concert Mode.”
3. List of concerts
Choose an concert date. If attending multiple sessions, register your seating information after each session. Select the concert date and either select [Manually Specify Seating Info] or [Enter QR Code/Barcode].
4. Enter seating information
Input the seating information from your ticket, scrolling through each field to make a selection. Verify the entered seating info is correct.
5. Check seating information
Ensure that the seating information on the app matches the seating information on your ticket and light stick.
6. Connect Bluetooth
Have your light stick ready and follow the on-screen instructions. Ensure the light stick is blinking blue, then press the “Connect” button. Bring the light stick close to your smartphone screen until a Bluetooth connection dialog appears. Press “Connect.” If the smartphone screen changes to the same color as the light stick, press the “Confirm” button. If Bluetooth connection fails, restart the process from the beginning.
7. Finish entering seating information
Once the information has been entered, “Seating info successfully entered into the light stick” will be displayed on the screen.
Q1. Does the light stick come with batteries?
A1. No, batteries are not included.
Q2. How many batteries does the light stick require?
A2. Three alkaline AAA batteries are needed.
Q3. Can I use rechargeable batteries with the light stick?
A3. Alkaline AAA batteries are recommended for the light stick.
Q4. What kind of battery socket is inside the light stick?
A4. It is recommended to use the original battery socket supplied with the product.
Q5. My light stick is damaged. Is it covered under warranty?
A5. If your purchase was made within the last three months, please refer to the contact information in the user manual to inquire about our warranty service.
Q6. Does the light stick have a “react mode?”
A6. No, this product does not have a react mode.
Q7. Does the light stick react to music? How can I make it react? My light stick doesn’t react to music!
A7. No, it is designed to sync during concerts, not with music.
Q8. I bought a faulty light stick at a concert. Can I get a replacement or refund?
A8. Request a replacement or refund at the FANLIGHT Support Center within the concert venue.
Q9. Where can I buy light sticks?
A9. Online: YG Select, Weverse Shop (Links to the online shops are provided in the app.)
Stores: YG Place Insa Branch, TheSameE MD Shop, TheSameE Myeong-dong
Q10. I want to register my light stick ahead of a concert.
A10. On the app’s main screen, select “Concert Mode” and manually enter your ticket details.
Q11. How do I enter my seating information for a concert?
A11. On the app’s main screen, select “Concert Mode” and manually enter your ticket details.
Q12. How can I check my light stick’s battery power?
A12. On the app’s main screen, select “Self Mode” to check battery info.
Q13. Can I give my light stick a new name?
A13. The app does not support renaming light sticks.
Q14. Can I change the concert seating info I entered earlier?
A14-1. On the app’s main screen, select the Menu icon at the top right, then change your seating information under “Ticket Info.”
A14-2. Alternatively, select “Concert Mode” and manually re-enter your ticket details.
Q15. How do I de-register my light stick?
A15. For Android: Go to Settings -> Connections -> Bluetooth
For iOS: Go to Settings -> Bluetooth
Follow these paths to de-register your light stick.
Q16. My light stick won’t sync, and I see the message “Could not sync light stick. Retrying now.”
A16. For Android: Settings -> Connections -> Bluetooth
For iOS: Settings -> Bluetooth
Follow the above paths to de-register your light stick and then re-register it to resolve the issue.
Q17. How do I update my light stick’s firmware?
A17. On the app’s main screen, select the Menu icon at the top right, and select “Firmware Version” to update it.


